Workflows in AI for Process automate business processes by orchestrating AI models, integrations, and human decision points into a structured, executable sequence. Each workflow run is independent and stateless, producing predictable, repeatable outputs.
What Is a Workflow
A workflow is a directed graph of nodes connected by transitions. You define the logic—what happens, in what order, under what conditions—and the platform executes it. Workflows do not retain memory between runs; each execution starts fresh from the inputs provided at runtime.
Workflows can:
- Process structured and unstructured data using AI models.
- Integrate with external systems via APIs or pre-built connectors.
- Route execution through conditional branches or parallel paths.
- Pause and wait for human input before resuming.
- Start automatically in response to external events or on a schedule.
The platform provides the Workflow Builder, a visual no-code/low-code interface for designing workflows by placing and connecting nodes on a canvas. Every element in the workflow is part of a deployable API endpoint after deployment.
Workflow Architecture
Execution model
A workflow runs from a Start node through processing nodes to an End node. Execution follows the connections you define. The platform maintains a context object—a shared runtime state container—for the duration of each run. Nodes read inputs from this context and write their outputs back to it.
[Start Node] ──► [Node A] ──► [Node B] ──► [End Node]
                     │
                     ├──► [Node C]  ─────► [End Node]
                     │    (parallel branch)
                     └──► [Node D]  ─────► [End Node]
- Stateless: the context object is discarded after each run. Workflows do not persist state across executions.
- Sequential execution: nodes run one after another when tasks depend on prior results.
- Parallel execution: multiple branches from the same node run simultaneously for independent tasks. A single node supports up to 10 outgoing parallel branches.
- Context propagation: nodes reference each other’s outputs using
{{context.steps.NodeName.output}} syntax, resolved at runtime without manual wiring.
Start node and workflow initiation
Every workflow begins with a Start node, added automatically when you create a workflow. The Start node is the mandatory entry point and must connect to at least one other node.
The Start node defines:
| Setting | Purpose |
|---|
| Input variables | Data passed into the workflow at runtime. |
| Output variables | Variables captured from the workflow’s results. |
| Event triggers | Automatic initiation when a specific event occurs in a connected third-party application—for example, a new Jira issue or a Salesforce record update. |
| Scheduled execution | Time-based initiation using daily, weekly, monthly, cron, or custom intervals. |
Context object
The context object is the central runtime state container for a workflow execution. It tracks inputs, intermediate outputs, node status, and metadata for all nodes in a single run.
| Category | Contents |
|---|
| Run metadata | Identifiers, timestamps, version, and workflow instance information. |
| Execution state | Each node’s input, output, status, and timing data. |
| Environment and config | Runtime parameters, environment variables, and execution settings. |
{{context.steps.NodeName.output.field}} syntax. This declarative referencing resolves lazily—right before each node executes. Script nodes can also extend the context object dynamically, adding computed values accessible to downstream nodes.
// Reference a previous node's output in any input field, prompt, or condition
{{context.steps.ExtractData.output.invoice_number}}
Node Types
Nodes are the building blocks of a workflow. Each node performs a discrete, self-contained task. Nodes connect through success and failure paths, enabling controlled branching and error handling.
Start Node
  │
  ├──► AI Node ──────────────── calls ──► Model (Model Hub)
  │
  ├──► Integration Node ──────── calls ──► External API / Service
  │
  ├──► Agentic App Node ──────── invokes ──► Deployed AI Agent
  │
  ├──► Function Node  (custom JavaScript or Python logic)
  │
  ├──► Condition Node (branching based on if/else logic)
  │
  ├──► Loop Node     (iterate over a dataset)
  │
  ├──► Human Node   (pause for review or approval)
  │
End Node
        │
        ▼
  Context object (shared across all nodes, discarded after run)
| Node category | Purpose |
|---|
| Start / End | Entry and exit points. Every workflow requires both. |
| AI nodes | LLM-powered nodes for text, image, audio, and document processing. |
| Integration nodes | Connect to third-party services via pre-built connectors or custom APIs. |
| API nodes | Call external REST APIs and use the response in downstream nodes. |
| Function nodes | Execute custom JavaScript or Python logic inline. |
| Condition nodes | Route execution based on if/else expressions. |
| Loop nodes | Iterate over a list, running child nodes for each item. |
| Human nodes | Pause execution and send a task to the Inbox for human input. |
| Agentic App nodes | Delegate a task to a deployed AI agent for autonomous reasoning. |
| Doc Intelligence nodes | Parse and extract structured data from documents. |
| Doc Search nodes | Query a knowledge base or vector store. |
AI nodes
AI nodes are multimodal components powered by LLMs from the Model Hub. They support diverse input and output formats within a single workflow.
| AI node type | Function |
|---|
| Text-to-Text | Summarization, generation, extraction, and translation. |
| Text-to-Image | Generate images from text prompts. |
| Image-to-Text | OCR, image description, and visual analysis. |
| Audio-to-Text | Transcription and speech recognition. |
| Doc Intelligence | Document parsing and structured data extraction. |
{{context}} references—and returns a structured or unstructured response stored in the context object for downstream nodes.
Relationship Between Workflows, Nodes, Models, and Agents
The platform separates concerns across four layers that work together to automate a process end to end.
| Layer | Role in automation |
|---|
| Workflow | Orchestrates the overall process—defines order, conditions, and data flow. |
| Nodes | Perform individual tasks within the workflow. |
| Models | Provide inference for AI nodes; configured and managed in Model Hub. |
| Agents | Autonomous reasoning components integrated via Agentic App nodes. |
How they connect
- A workflow contains nodes connected by transitions. The workflow determines what runs, when, and in what order.
- AI nodes call models. The model processes the input and returns an output stored in the context object for downstream nodes.
- Agentic App nodes invoke a deployed AI agent. Unlike a static AI node, an agent can reason, plan, and use tools autonomously. The workflow passes input to the agent and receives structured output after the agent completes its task. The Agentic App node performs one turn of communication per execution.
- The context object acts as the data bus: nodes read from it and write to it, passing information downstream without manual wiring.
When to use agents within workflows
Use an Agentic App node when a workflow step requires:
- Reasoning over unstructured or ambiguous input.
- Multi-tool decision-making that cannot be expressed as a fixed node sequence.
- Dynamic task decomposition—for example, incident triage or invoice exception handling.
For deterministic, structured tasks, use standard AI nodes or Function nodes instead. Agentic nodes add flexibility but also add latency, as the agent must fully complete before the workflow continues.
Workflow Management
The platform provides features for end-to-end workflow implementation and maintenance.
| Phase | Feature | Description |
|---|
| Build and design | Workflow Builder | Visual no-code/low-code builder for creating and managing workflows and workflow versions. Build from scratch or import existing ones. |
| Configure and manage | Configurations | Manage workflow metadata, define reusable values using environment variables, and control workflow deployment. |
| Collaborate and control access | Sharing and Permissions | Invite users to collaborate on specific workflows. Invited users see only the workflows they are invited to. |
| Deploy and integrate | Workflow Endpoint and API Keys | Deploy a workflow to generate a dedicated API endpoint for integration with external systems. Create API keys to enable secure access to deployed workflows. |
| Monitor and optimize | Workflow Monitor | Track and analyze workflow executions across multiple runs to identify issues and optimize performance. |
| Govern and audit | Guardrails and Audit Logs | Apply guardrail models to scan LLM inputs and outputs, enforcing safety and content policies. View detailed audit logs for all workflow activities for troubleshooting and traceability. |
Create a Workflow
-
Log in to your account.
-
On the Workflows page, select Create new workflow. The New workflow dialog box opens.

-
Enter a name and a brief description for the workflow.
-
Select Create. The workflow is created and the Workflow page opens. You can now build your workflow in the Flow Builder.
Configure a Workflow
From your workflow’s Configurations page, you can update workflow details, set the sync/async mode, manage environment variables, and undeploy or delete the workflow.
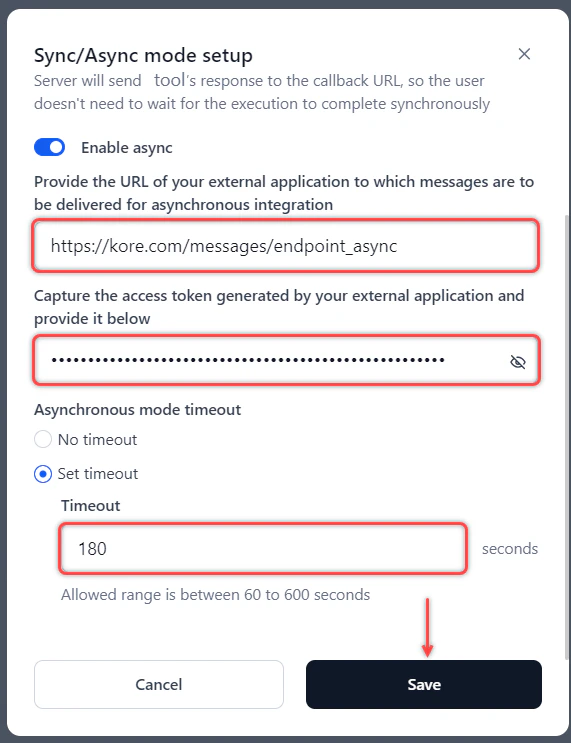
Set sync/async mode
The sync/async mode determines how the workflow endpoint responds to callers. Synchronous mode blocks the client until the workflow completes and returns a response. Asynchronous mode lets the client continue working while the workflow processes the request and delivers the result to a callback URL.
If you change the mode after deployment, you must redeploy the workflow for the change to take effect.
-
On the Configurations page, select Setup sync/async.

-
Configure the mode:
-
Synchronous mode: Set the timeout duration. The allowed range is 60–300 seconds (default: 180 seconds). The endpoint returns a timeout error if the workflow does not complete within this window.

-
Asynchronous mode: Turn on the Enable async toggle, then:
- Enter the URL of the external application to receive the workflow’s response.
- Enter the access token generated by the external application.
- Set the timeout:
- Set timeout: Allowed range is 60–600 seconds (default: 180 seconds).
- No timeout: The workflow runs without a time limit.
-
Select Save.
Timeout precedence: Workflow timeout > Node timeout > Model timeout.
Manage environment variables
Environment variables store reusable values—such as API base URLs or configuration flags—that nodes across the workflow can reference. Marking a variable as secure encrypts its value.
Add an environment variable
-
On the Configurations page, select Manage environment variables.

-
Select Add or Add variable. The Add variable dialog box opens.

-
Provide the following details and select Save.
| Field | Description |
|---|
| Variable name | A descriptive name for the variable. |
| Secure variable | Enable to encrypt the variable’s value. Read the on-screen information before enabling. |
| Value | The value to store. |
| Notes (optional) | Usage notes or context for the variable. |
Edit or delete an environment variable
Select the three-dots icon next to the variable name and choose Edit or Delete.

Undeploy a workflow
Undeploying a workflow disconnects it from all active instances immediately. Use this when you need to take a workflow offline without permanently removing it.
On the Configurations page, select Proceed to undeploy and follow the on-screen instructions.
Delete a workflow
You can only delete a workflow that is not deployed. Deleting a workflow removes the workflow and all its associated data permanently.
On the Configurations page, select Proceed to delete and follow the on-screen instructions. 