
- Agent AI Channel Specific Settings — channel-specific preferences for Chat, Voice, and Email.
- Agent AI General Settings — widget-wide behavior and display options.
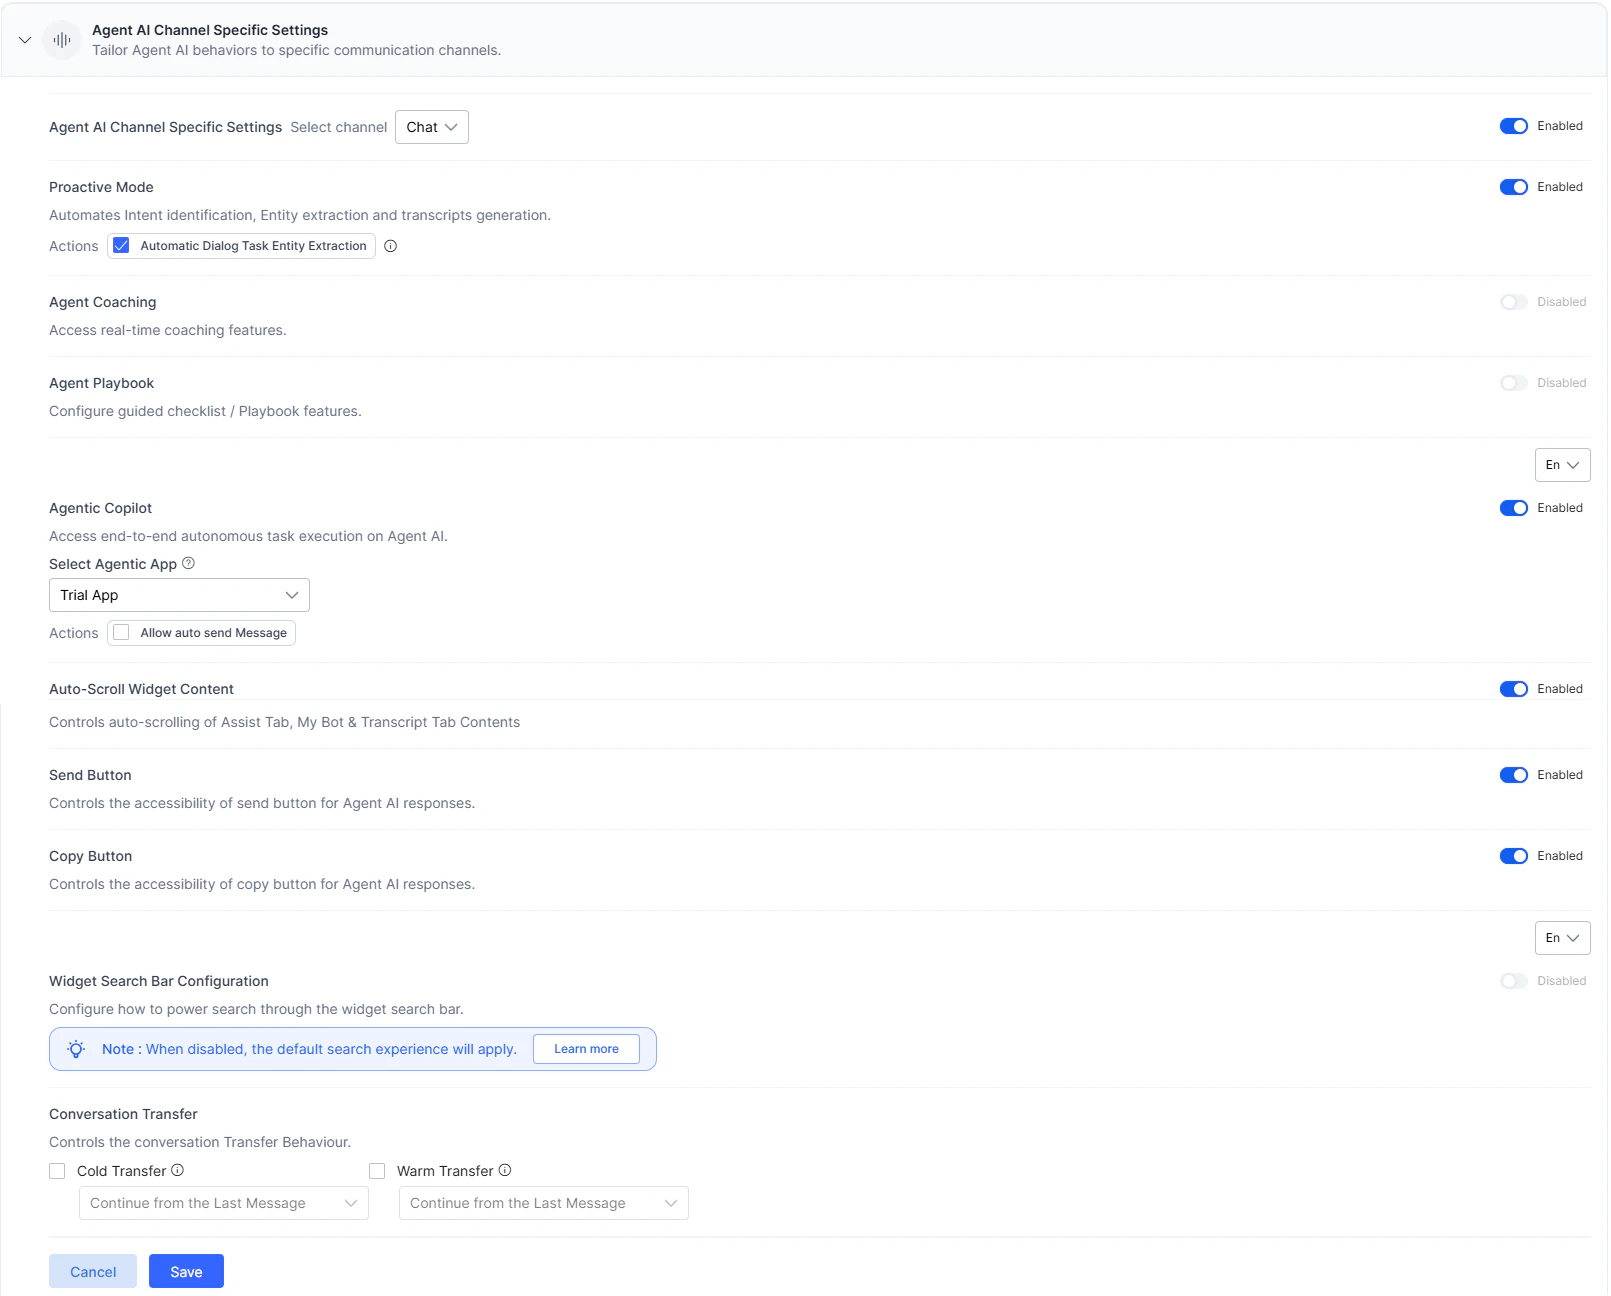
Agent AI Channel-Specific Settings
Configure widget features per channel. The following options are available:| Setting | Description |
|---|---|
| Proactive Mode | Automates intent identification, entity extraction, and transcript generation. When enabled, also supports Automatic Dialog Task Entity Extraction. Enabled by default for all channels. |
| Agent Coaching | Enables real-time coaching based on agent utterances and speech analysis. Disabled by default; available for Chat and Voice channels. |
| Agent Playbook | Provides structured guidance for agents. When disabled, the Playbook tab is hidden; when enabled, welcome messages become part of the Playbook step. Disabled by default. |
| Agentic Copilot | Enables autonomous, end-to-end conversation handling. Agents can cancel, override, or edit messages. Configure language, app selection, auto-send, and timer. |
| Agentic Response Streaming | Streams Agentic Copilot responses incrementally, reducing perceived latency during live conversations. |
| Auto-Scroll Widget Content | Automatically scrolls to the latest content in the Assist, My AI Agent (Bot), and Transcript tabs. Agents can override this setting in the widget’s Settings tab. |
| Control Transcript Visibility between Agents (Voice only) | Restricts transcript visibility to the current agent. Exceptions apply for warm transfers and conference calls. |
| Send Button | Controls the Send button for Agent AI responses. Available for Chat and Email; enabled by default for Chat. |
| Copy Button | Controls the Copy button for Agent AI responses. Available for Chat and Email; enabled by default for both. |
| Widget Search Bar Configuration | Configures search sources. When enabled, select from XO Platform, Search AI, and Agentic App. When disabled, results from all sources load simultaneously. |
| Conversation Transfer | Defines behavior when a conversation is transferred between agents. Applies to third-party configurations with appropriate transfer events. |
- The Assist tab Run button is disabled; only Run with agent’s input is available.
- Dynamic playbook identification and adherence are inactive; tick-off and step progression still work.
- Primary playbook automatic adherence or tick-off does not occur.
- If the Playbook widget is also disabled, the default landing page is My AI Agent (Bot).
| Transfer Type | Description |
|---|---|
| Cold Transfer | Handover between two agents. Applies to Voice, Chat, and Email. A new summary is generated for the receiving agent. |
| Warm Transfer | Conference call between two agents. Applies to Voice and Chat. Agent-2 can modify Summary Feedback, but Run, Override, Send, Copy, Terminate, Restart, and List View buttons remain disabled until Agent-1 disconnects. |
- Scroll up to the First Message — opens chat history at the top.
- Continue from the Last Message — opens chat history at the bottom.
- Configure Dialog Task — runs a selected dialog task automatically when the conversation is transferred.
Steps to Set Channel-Specific Preferences
- Sign in to XO Platform.
- Go to Agent AI > Configuration > Widget Settings > Agent AI Settings > Agent AI Channel Specific Settings.
- Expand Agent AI Channel Specific Settings.
- Select a channel from the Select channel list.
- Turn on the Agent AI Channel Specific Settings toggle if it is off.
-
Turn Proactive Mode on or off.
- Select or clear Automatic Dialog Task Entity Extraction.
- Turn the toggles on or off for Agent Coaching, Agent Playbook, Agentic Response Streaming, Auto-scroll widget content, Send Button, and Copy button.
-
For Agentic Copilot:
- Select a language.
- Enable or disable Agentic Copilot.
- Select an assignment option:
-
Enable for all Agents — the selected app applies to all queues.
- Select an app from Select Agentic App.
- Select Allow auto send Message to enable auto-send.
- Use the slider to set the delay (up to 60 seconds).

-
Enable for Specific Queues — assigns apps to specific queues via Agent AI Mapping.
- Select Open AI Feature Mapping to navigate to Agent AI Mapping.
- Select learn more for queue configuration details.

-
Enable for all Agents — the selected app applies to all queues.
-
Turn on or off Control Transcript Visibility between Agents (Voice channel only) and select:
- Use public APIs to control transcription
- Use agent’s entry and exit events

-
Turn on Widget Search Bar Configuration.
- Select one or more options — XO Platform, Search AI, Agentic App.
- If Agentic App is selected, choose an app from the dropdown.
Search AI and Agentic App fields are unavailable until configured. A warning message prompts you to configure them first. - Select an option under Conversation Transfer.
-
Select Save.
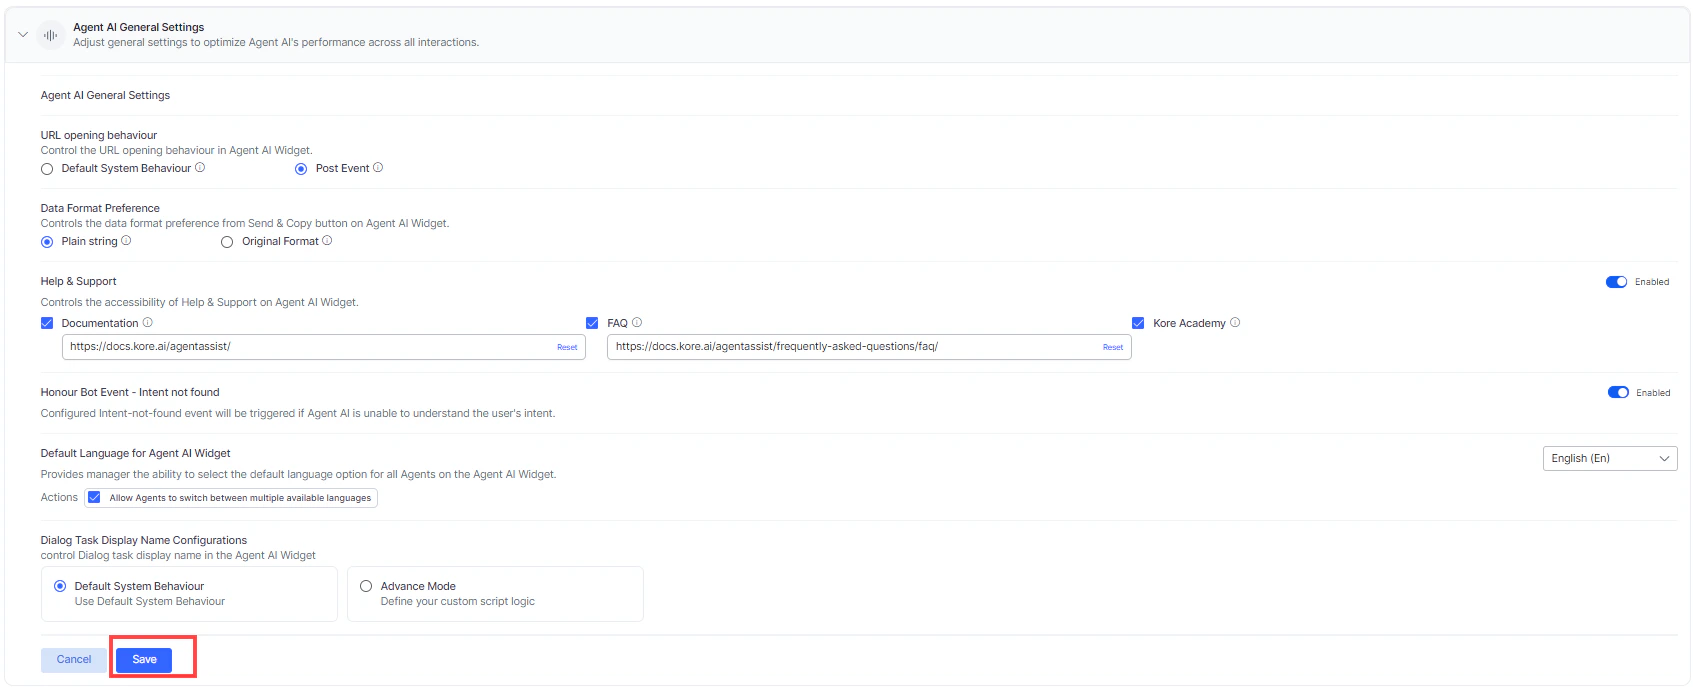
Agent AI General Settings
Configure global widget behavior including URL handling, data format, and language preferences.| Setting | Description |
|---|---|
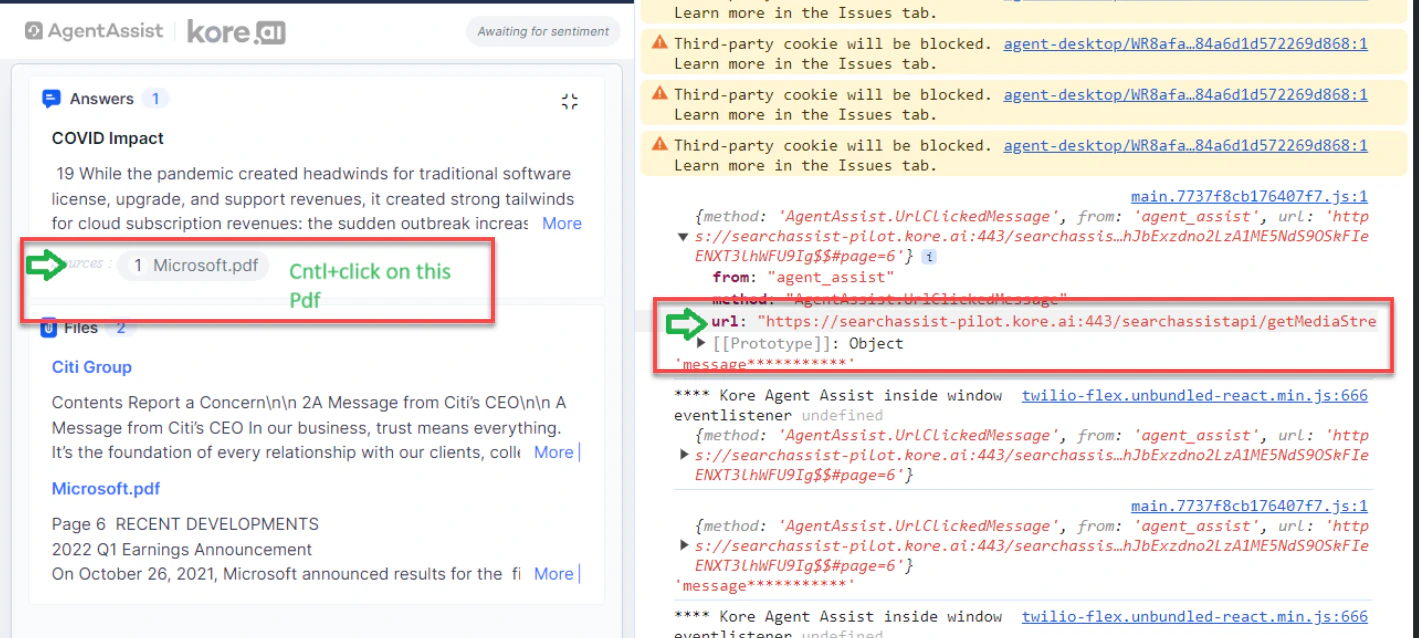
| URL Opening Behavior | Default System Behavior — links open in a new window. Post Event — triggers the AgentAI.UrlClickedMessage event so the desktop app controls the link’s behavior. |
| Data Format Preference | Plain String — sends messages in plain text. Original Format — sends messages with HTML tags as received. Applies to Playbooks and Dialog Tasks. |
| Help & Support | Show or hide Help & Support in the widget. Configure which components appear (Documentation, FAQ, Kore Academy) and their URLs. |
| Honor Bot Event – Intent not found | When enabled, triggers the configured intent-not-found event if Agent AI cannot identify the user’s intent. |
| Default Language for Agent AI Widget | Sets the widget display language. Optionally allow agents to change the language at runtime. |
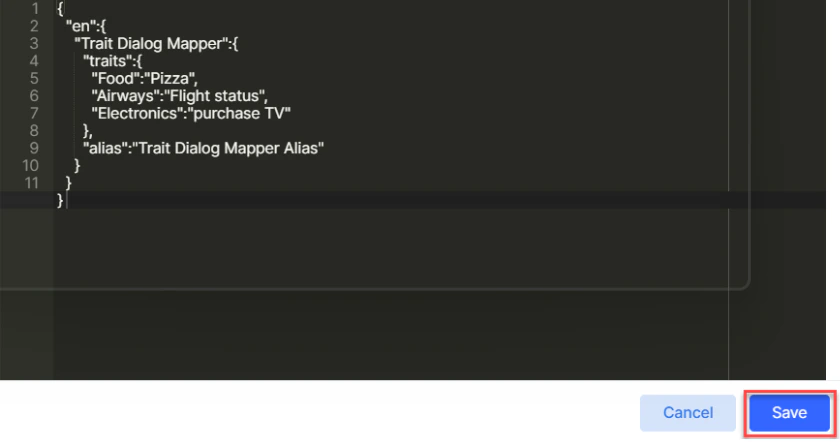
| Dialog Task Display Name Configurations | Default System Behavior — standard display. Advanced Mode — use custom script logic for trait-based dialog task display. |
AgentAI.UrlClickedMessage event fires and a log appears on the right showing the URL. Desktop applications use this URL to control how the link opens.
Steps to Set Agent AI General Settings
- Go to Agent AI > Configuration > Widget Settings > Agent AI Settings > Agent AI General Settings.
- Expand Agent AI General Settings.
- Select Default System Behavior or Post Event under URL opening behavior.
- Select Plain String or Original Format under Data Format Preference.
-
Enable or disable Help & Support.
- Select the components to display — Documentation, FAQ, Kore Academy.
- Customize the URLs for Documentation and FAQ as needed.
- Enable or disable Honor Bot Event – Intent not found.
-
Select a language from the Default Language for Agent AI Widget list. Select Interactive Language to use the app’s language.
- Select or clear Allow agents to switch between multiple available languages.
-
Select Default System Behavior or Advanced Mode under Dialog Task Display Name Configurations.
- For Advanced Mode, enter a custom script in the pop-up and select Save.
-
Select Save.
Auto-Correct for the Search Tab
The Auto Correct feature highlights misspelled words in the Search tab and suggests corrections. Admins configure it in Widget Settings; agents can override the setting in the widget’s Settings tab. Admin steps:- Sign in to Agent AI.
- Go to Widget Settings > Agent AI General Settings.
- Turn the Auto Correct toggle on or off.
- Select or clear Use Custom Dictionary.
-
Upload a customized word list.
You can download the current word list if one has already been uploaded.
- Select Save.
- Sign in to the Agent AI widget.
- Go to the Settings tab.
- Enable or disable the Auto Correct toggle.