
This integration works only with Genesys Cloud CX Messaging channel, not the older Genesys web chat.
- Set up the REST API and authorization flow for events and conversations.
- Link the app to the Platform using the app’s credentials.
- Deploy the app and transfer conversations to the Genesys Agent System.
- Leverage various templates like Button, Quick Replies, and Bullets List provided by Genesys for message formatting.
- Accept any attachments in the chat messages that Genesys supports.
- Track AI Agent conversations.
- Listen to new messages from Genesys Cloud CX Messaging.
- Have Apps post and respond to messages in Genesys Cloud CX Messaging conversations.
- Have Apps handle incoming notifications from your apps into Genesys Cloud CX Messaging.
- Create a Bot Connector and Link the App to the Connector.
- Create an App in the Kore.ai Web/Mobile Client.
- Create the OAuth Client App in the Genesys Developer Console.
- Create an inbound message flow.
- Configure the Messenger SDK.
- Enable the Channel.
- Publish the App.
Step 1: Create a Bot Connector
A Bot Connector integration enables your bot to exchange messages with the Genesys Agent System configured on the Platform by using industry-standard REST and JSON over HTTPS.- Log in to the Genesys Developer Portal.
- Create a Bot Connector with the steps below:
- On the Genesys Cloud CX Admin portal
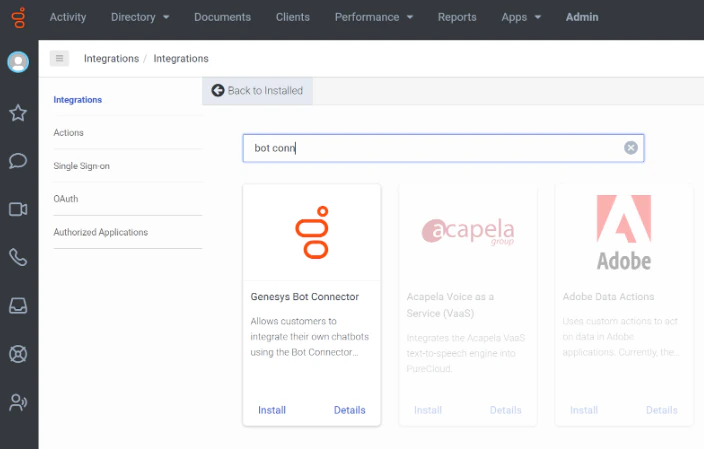
- In the Genesys Cloud Admin portal, navigate to Admin > Integrations.
- Use the + Integrations button to find integration options.
- Search for “bot connector” and find the Genesys Bot Connector. Install it to your instance.
- On the Platform
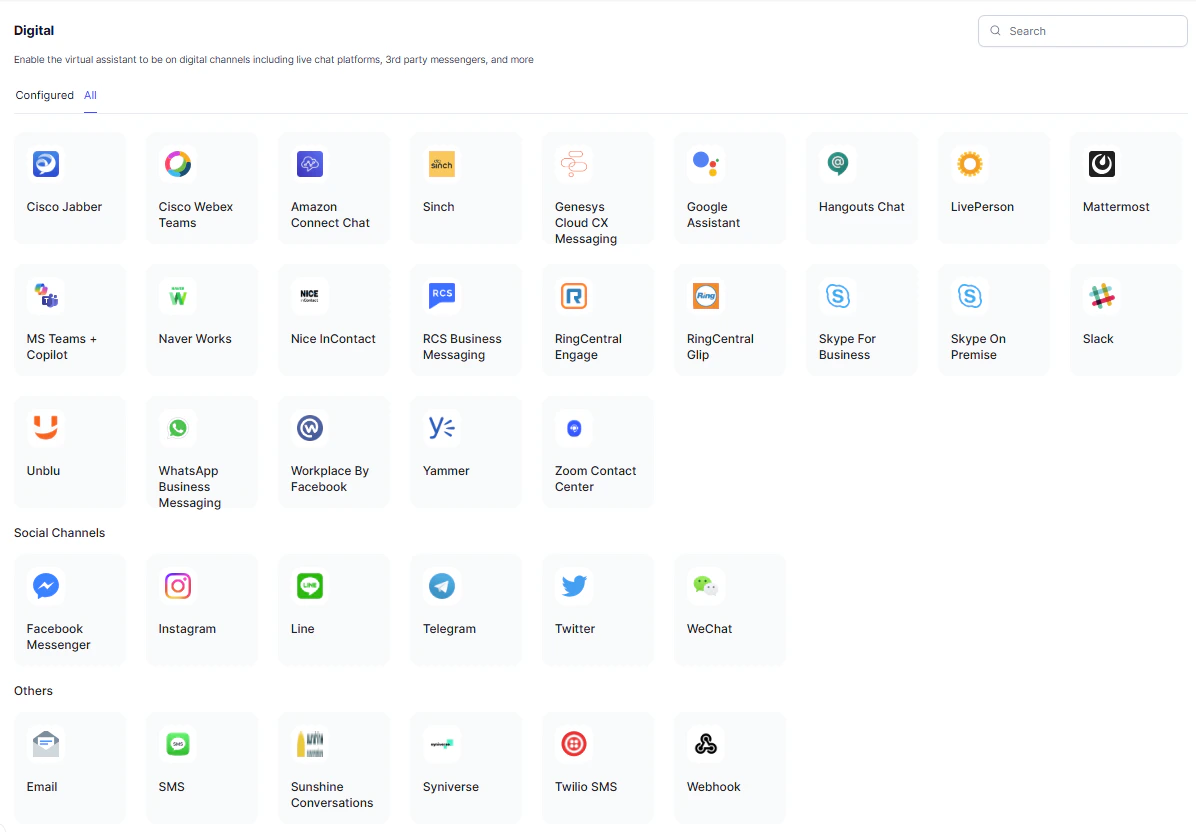
- On the Platform, navigate to Channels & Flows > Channels > Digital > All > Genesys Cloud CX Messaging.
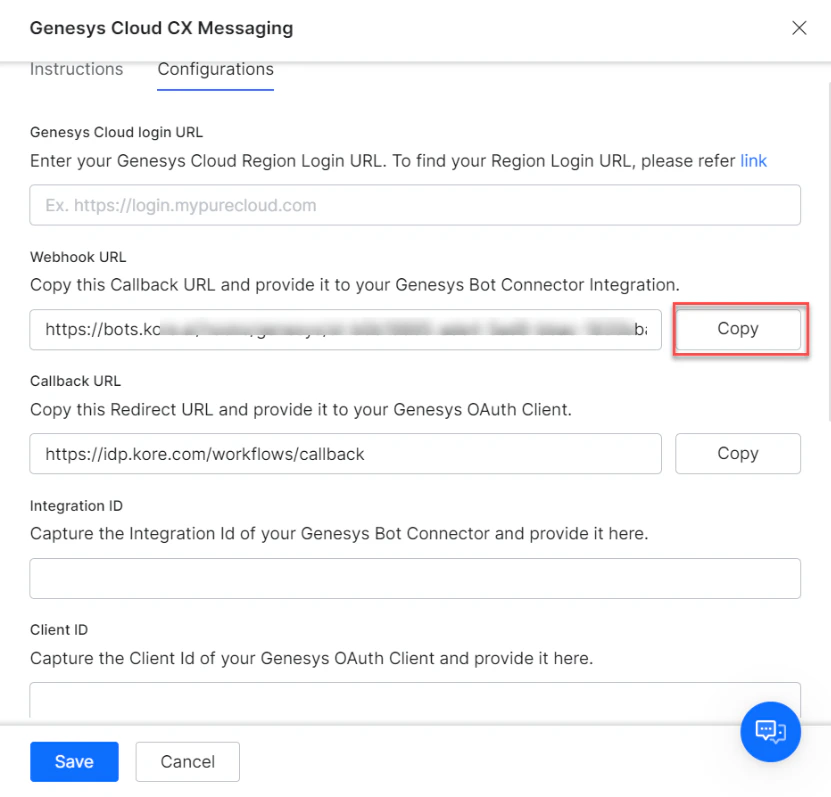
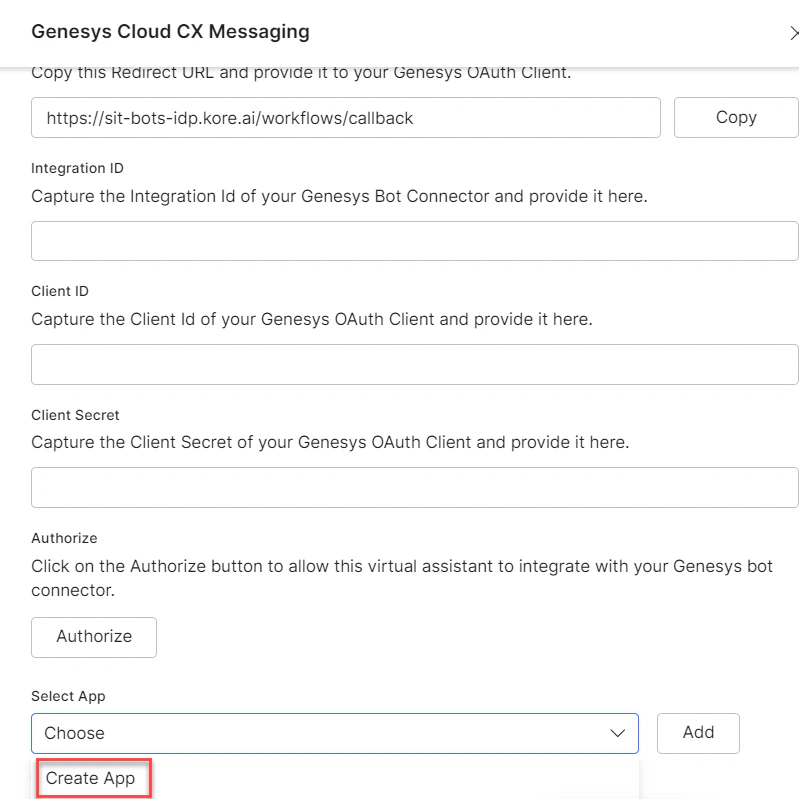
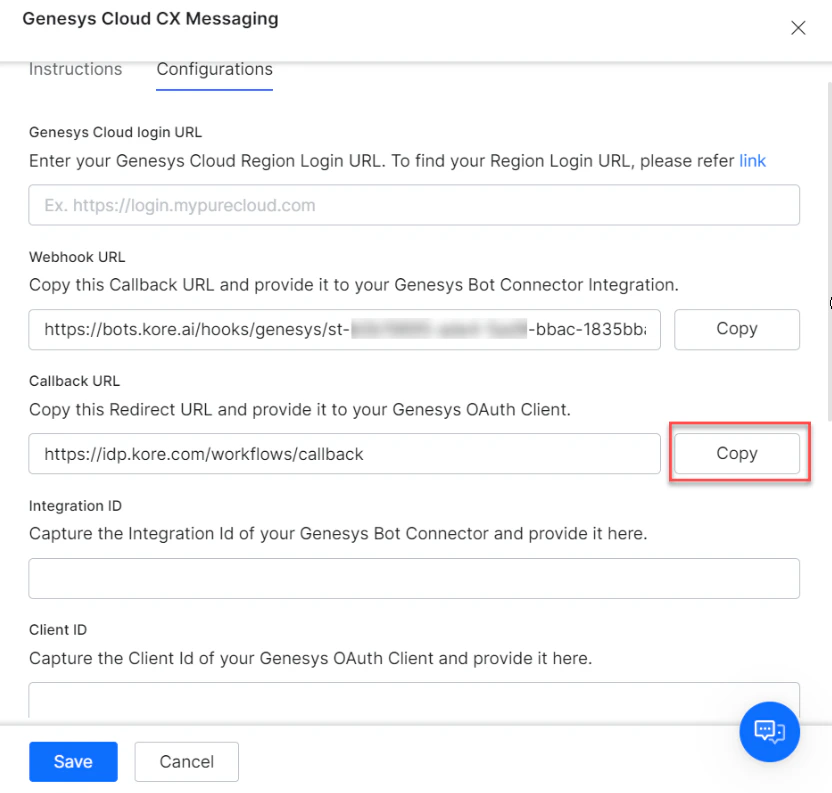
- Copy the Webhook URL from the Configurations section of the Platform for the Genesys Cloud CX Messaging Channel screen.
- On the Platform, navigate to Channels & Flows > Channels > Digital > All > Genesys Cloud CX Messaging.
- On the Genesys Cloud CX Admin portal
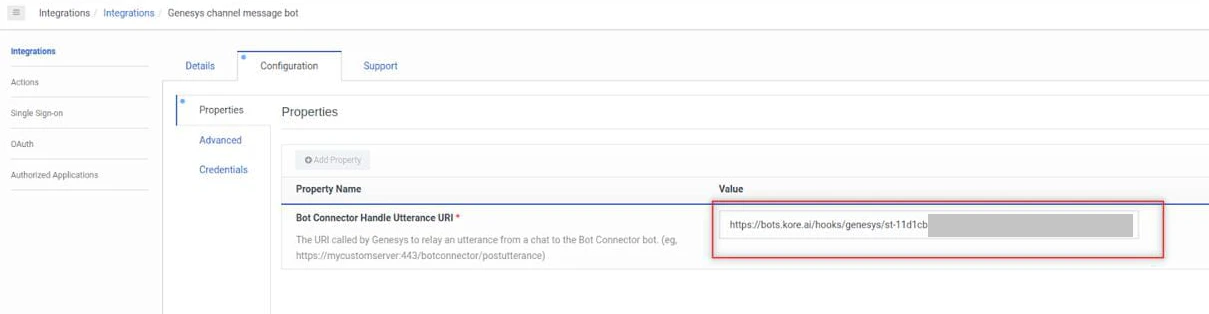
- Go back to the Genesys Admin portal. In the Properties section under Configuration for the Bot Connector, paste the webhook in the Value field for Bot Connector Handle Utterance URI.
- Leave this page open for additional configuration.
- Go back to the Genesys Admin portal. In the Properties section under Configuration for the Bot Connector, paste the webhook in the Value field for Bot Connector Handle Utterance URI.
- On the Platform
- In the Genesys Cloud login URL field under Configuration, provide the URL of your Genesys AWS Region, which will allow the platform to route the conversation requests correctly. This is a mandatory field. You can find the URL of your region through the link provided in the field description on the screen.

- Leave the Genesys Cloud CX Messaging channel configuration open for further configuration.
- In the Genesys Cloud login URL field under Configuration, provide the URL of your Genesys AWS Region, which will allow the platform to route the conversation requests correctly. This is a mandatory field. You can find the URL of your region through the link provided in the field description on the screen.
Step 2: Create an App on the Platform
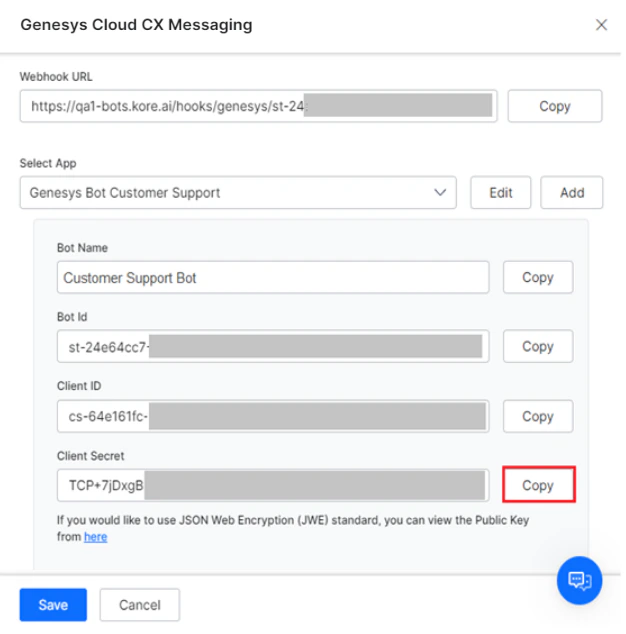
Create an app on the platform. A JWT Token is created with the clientId and clientSecret credentials. For more information, read Adding the Web/Mobile Client Channel article.-
Click the Create App link under the Configurations section of the Genesys Cloud CX Messaging Channel.
-
Use the Client ID and Client Secret value of the new app to create a JWT token using the steps mentioned here.
- Navigate back to the Bot Connector configuration screen in the Genesys Cloud Admin portal.
- Navigate to the Configuration > Credentials section and click Change.
- Create a new Field Name called Authorization.
-
Paste the following in the Value field on the Change Credentials window.
- The word bearer
- A space
-
The JWT created in before.
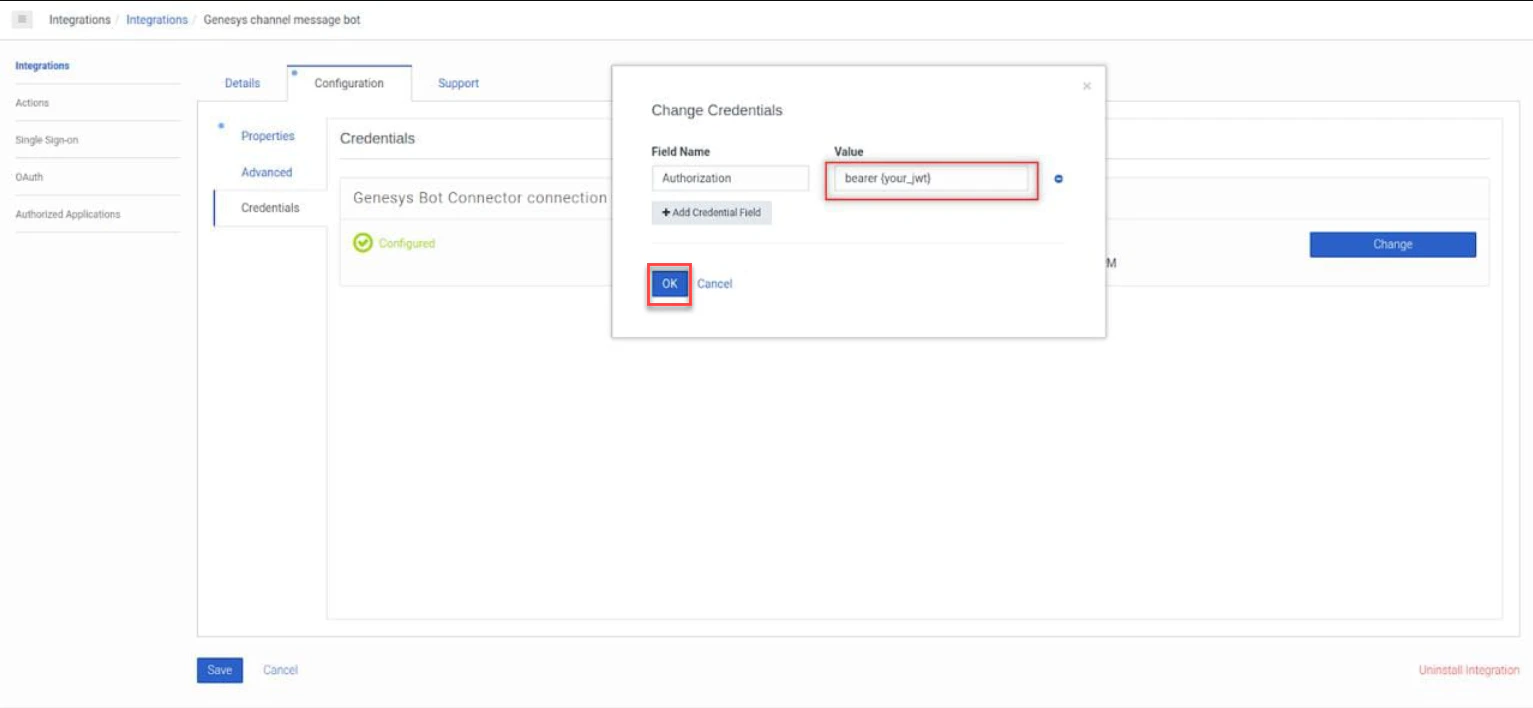
- Click Ok.
Select HS256 for JWT Signing Algorithms Used For Client App Authentication.
Step 3: Create the OAuth Client App on Genesys Developer Console
Steps to create an app on the Genesys Developer Console:- Log in to the Genesys Developer Portal.
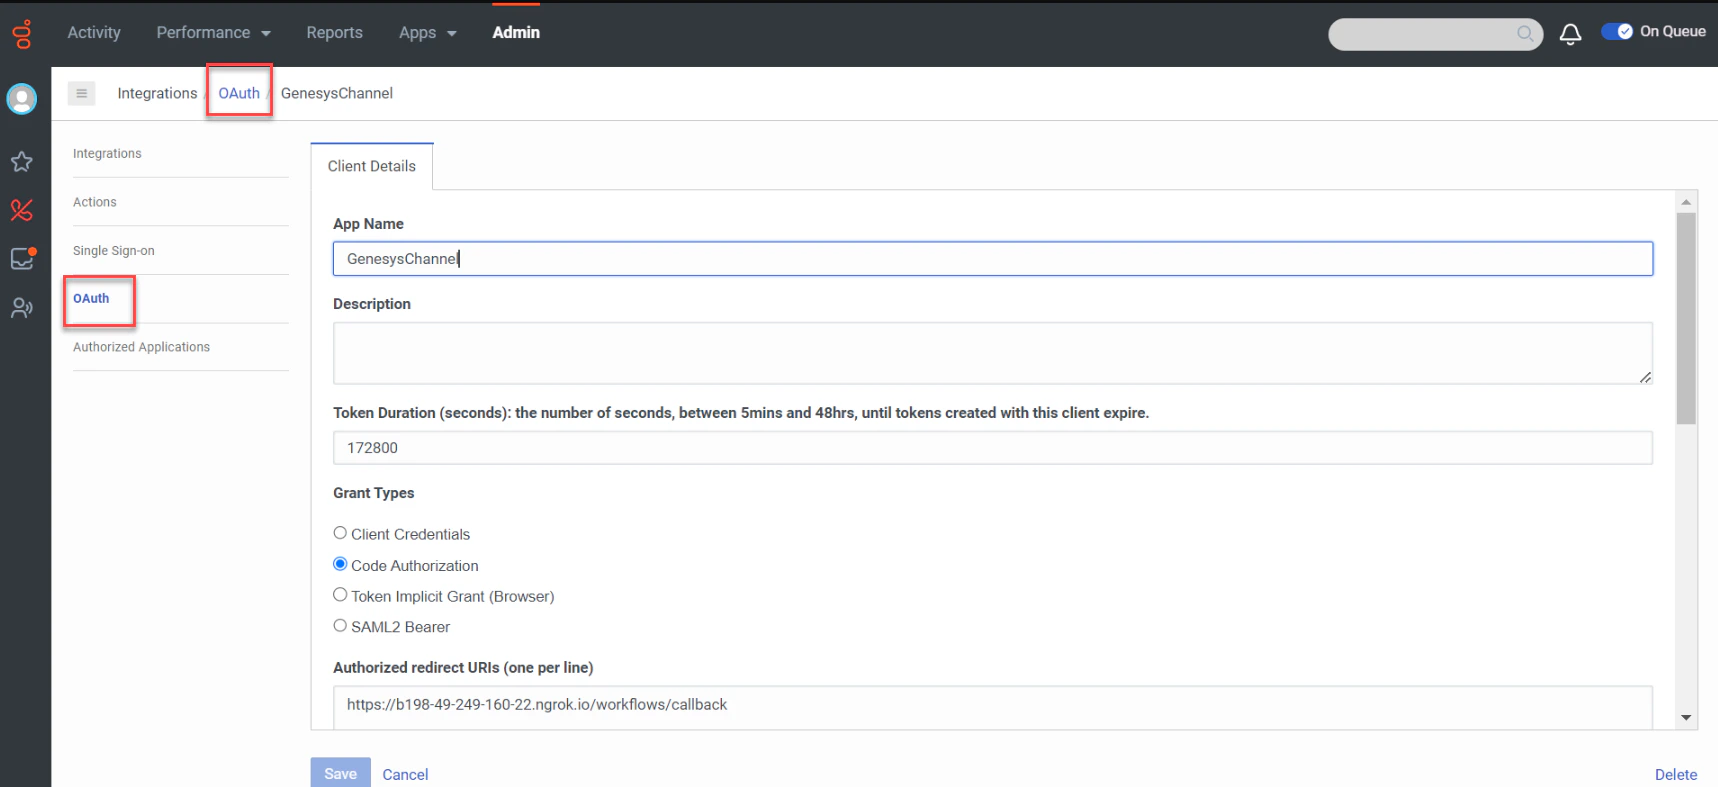
- Navigate to Admin > Integrations > OAuth.
- Click Add Client on the OAuth Screen.
- Enter the App Name and Description.
-
Select the Grant Types as Code Authorization.
-
Copy the Callback URL from the Configurations tab of the Platform for Genesys Cloud CX Messaging channel.
- In the Genesys Console, go back to the Integrations > OAuth page and paste the Callback URL that you have copied in the Authorized redirect URI field.
-
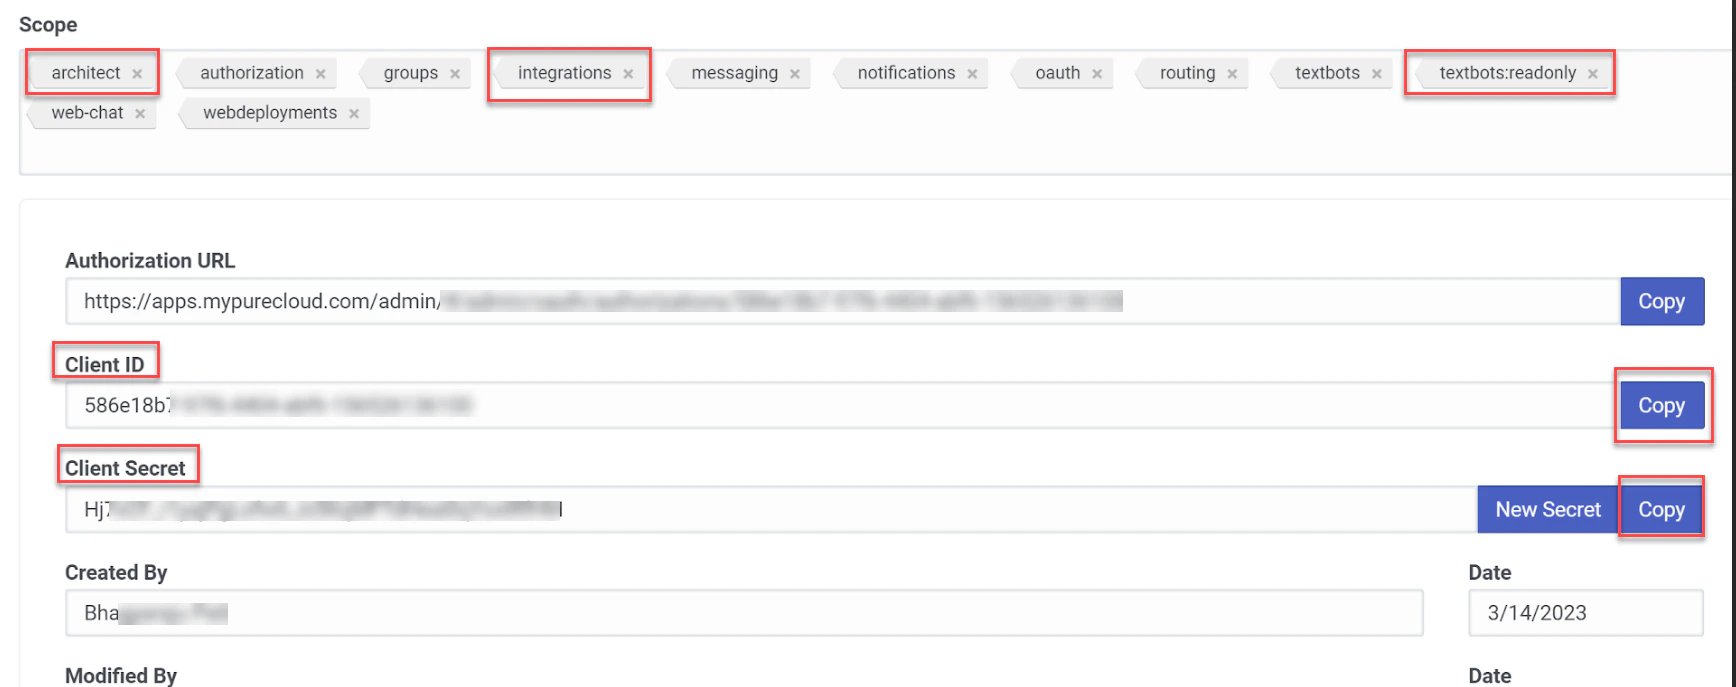
Add the architect, integrations, and textbot scopes in the Scopes field.
- Click Save to update the OAuth Client configuration.
- Copy the Client ID and Client Secret from the OAuth Client App page.
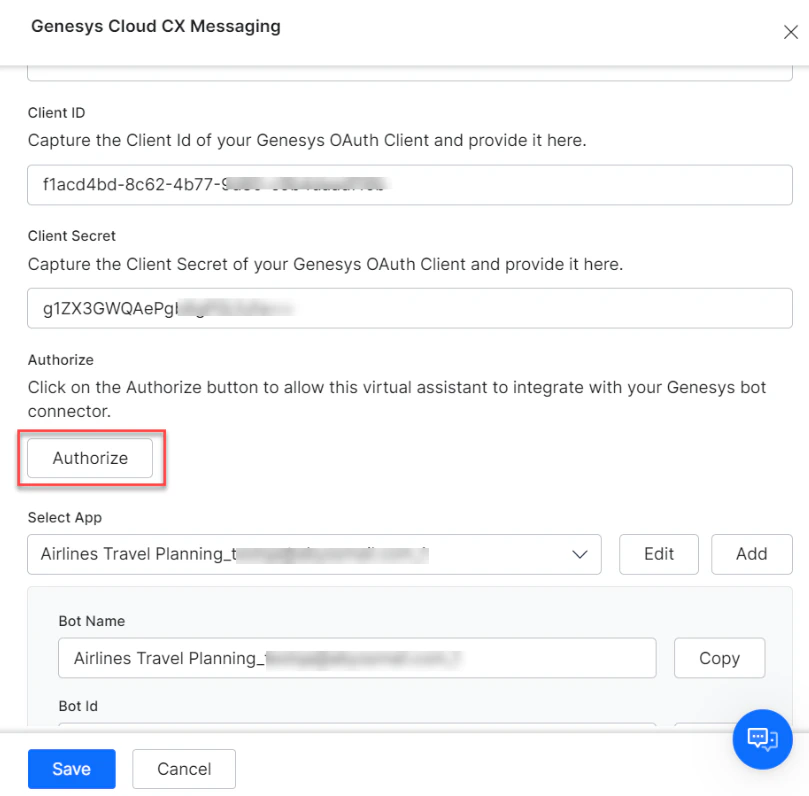
- In the Platform, return to the Channels & Flows > Channels > Digital > All > Genesys Cloud CX Messaging > Configurations tab and paste the Client ID and Client Secret values.
-
Once you paste all the required credentials, click Authorize to validate the authorization.
- If you are still logged into your Genesys Cloud instance, your current credentials are used. Otherwise, a login screen will open. Use valid credentials for the Genesys cloud instance you are configuring.
Step 4: Create an Inbound Message Flow
To create an inbound message flow after connecting your AI Agent to the Connector, follow the steps below:- Navigate to Admin > Architect on the Genesys Bot Connector page.
- Click the Flows: Inbound Message tab.
- Click the Add button.
- In the Create ‘Inbound Message Flow’ window, enter the values for the required fields.
- Click Create Flow.
-
After creating the Inbound Message Flow, follow the steps below:
- Click the flow you’ve created in the list.
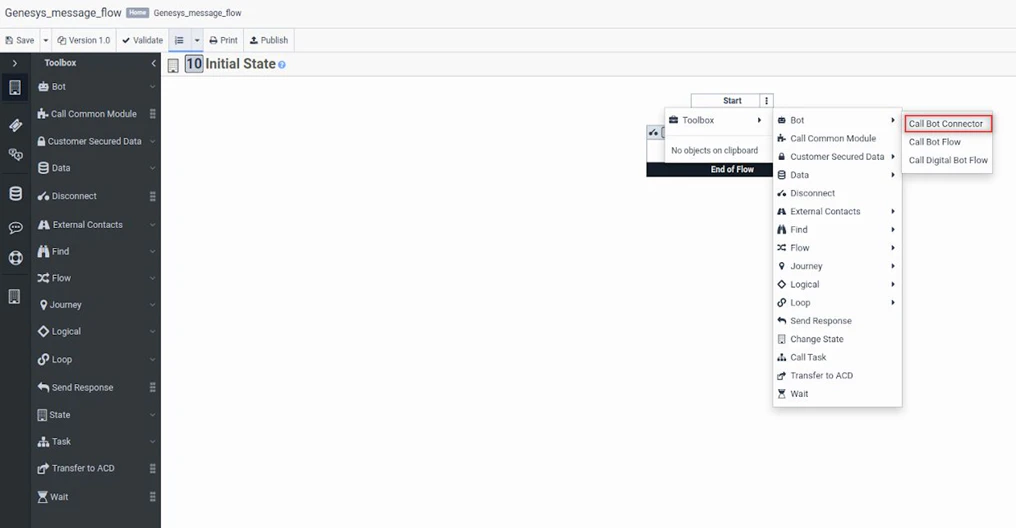
- Click the Initial State icon on the top menu.
- Select the Call Bot Connector option by navigating to Start > Toolbox > Bot.
- Select the bot connector and the relevant App from the list.
- Enter values for the given fields.
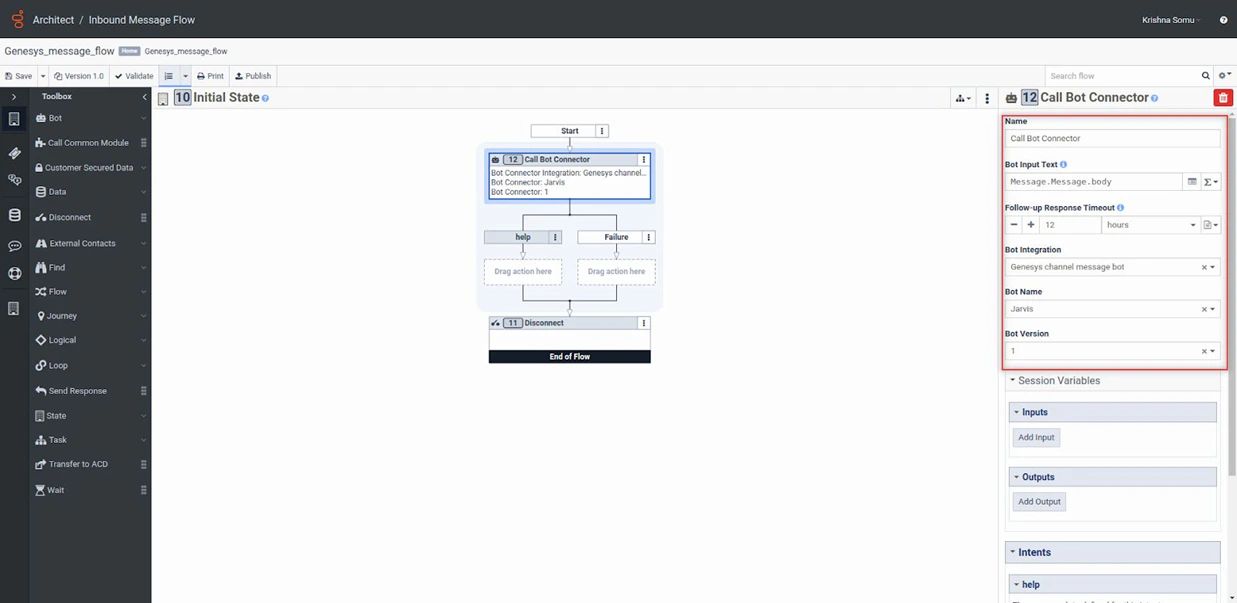
- Click Publish on the top panel.
Step 5: Configure the Messenger SDK
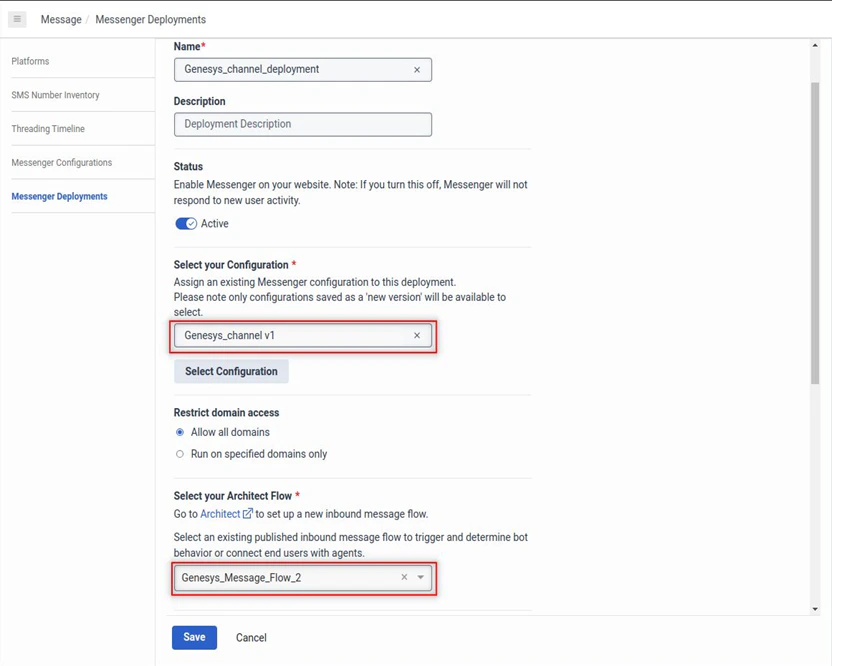
After creating the inbound messaging flow, you should configure and deploy the messenger with the steps below:- In the Genesys Cloud CX Admin portal, navigate to Admin > Message > Messenger Deployments.
- Enter the values for Name and Description.
- Set Status to Active.
- For Select your Configuration, select the Messenger Configuration to assign it to the deployment.
- For Restrict Domain Access, select Allow all domains.
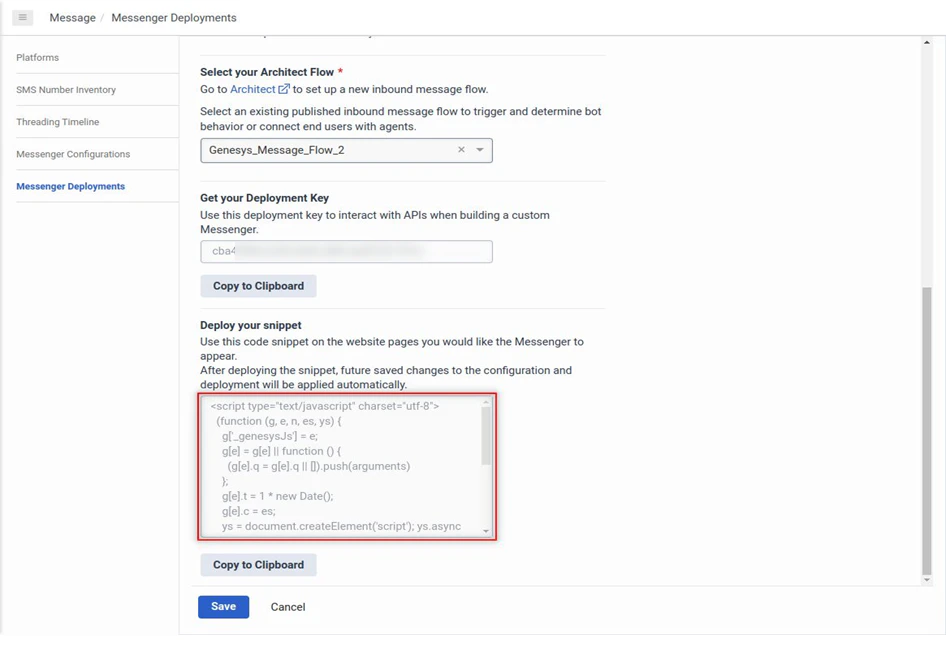
- For Select your Architect Flow, select your Message Flow created in the previous step.
-
Click Save.
The system routes the message sent by the user via the Genesys Messenger to the message flow.
-
Paste the script generated in the messenger deployment on the HTML page where you want to add the Genesys Messenger.
Step 6: Enable the Channel
After you’ve configured the Genesys Messenger and deployed it for your AI Agent, you must enable the Genesys Cloud CX Messaging Channel by following the steps below:- Navigate to Channels & Flows > Channels > Digital > All > Genesys Cloud CX Messaging on the Platform.
- Click the Configurations tab.
- Select YES for Enable Channel.
- Click Save.