
| Feature | Description |
|---|---|
| How Routing Works | How incoming conversations pass through queues and the routing engine before reaching an agent. |
| Routing Methods | Overview of Named, Standard, Advanced, and Load Balanced routing methods. |
| Standard Routing | Routes conversations to the agent with the highest skill and proficiency match. |
| Advanced Routing | Prioritizes a preferred agent, then falls back to skill-based routing if unavailable. |
| Load Balanced Routing (V3) | Distributes conversations evenly across agents without proficiency weighting. |
| Conditional Group Routing | Expands the agent pool beyond a single queue to reduce wait times while maintaining service levels. |
| Priority-Based Routing | Assigns priority levels (1–10) to conversations so higher-priority conversations are matched to agents first. |
| Language-Based Routing | Routes conversations to agents proficient in the customer’s detected language. |
| Winning Agent Selection | How the routing engine ranks and selects the best available agent for a conversation. |
| Percentage-Based Routing | Splits conversations across destinations by percentage using a Script node. |
| Routing Fallbacks | Handles scenarios when no agents are available, including wait messages, callbacks, and voicemail. |
| Routing Rules | Creates complex routing logic using conditions and actions. |
| Queues | Virtual waiting areas that hold conversations until an agent is assigned. |
| Skills | Agent attributes used to route conversations to the most qualified agent. |
| Testing Routing | Validates routing configuration using the Routing Simulator before deployment. |
How Routing Works
Incoming conversations pass through the following stages before reaching an agent:┌───────────────────────────────────────────────────────────┐
│ Incoming Conversation │
│ (with skills & language) │
└───────────────────────────┬───────────────────────────────┘
│ │
│ ▼
┌───────────────────────────────────────────────────────────┐
│ Queue │
│ (Virtual waiting area) │
└───────────────────────────┬───────────────────────────────┘
│ │
│ ▼
┌───────────────────────────────────────────────────────────┐
│ Routing Engine │
│ │
│ 1. Check preferred agent (if configured) │
│ 2. Match required skills │
│ 3. Match language │
│ 4. Consider proficiency levels │
│ 5. Check availability & capacity │
│ 6. Apply routing strategy │
└───────────────────────────┬───────────────────────────────┘
│ │
│ ▼
┌────────────────────────────────────────────────────────────┐
│ Agent Assignment │
└────────────────────────────────────────────────────────────┘
Before transfer: Conversations are queued and required skills are attached. Queues are holding areas independent of skills. Skills represent agent attributes such as expertise or language.
During transfer: The routing engine selects the best agent based on the configured routing method.
Routing Methods
| Method | Description | Best For |
|---|---|---|
| Named | Routes directly to a specific agent | Account managers |
| Standard (V2) | Matches all required skills and language; ranks by proficiency | Most use cases |
| Advanced (V2) | Adds preferred-agent priority and time-based skill relaxation | VIP customers |
| Load Balanced (V3) | Distributes by oldest last-assignment time; ignores proficiency | High-volume, similar-skill teams |
Standard Routing
Routes conversations to the agent with the highest skill and proficiency match.How It Works
- Find agents with all required skills.
- Filter by language match.
- Rank by proficiency level.
- Apply tiebreakers for equal proficiency:
- Fewest active conversations (lowest utilization)
- Longest idle time
Configuration Reference
Advanced Routing
Prioritizes a preferred agent, then falls back to skill-based routing if the preferred agent is unavailable.Preferred Agent Flow
┌──────────────────┐
| Customer Calls |
└──────────────────┘
| |
| ▼
┌────────────────────────┐
| Check Preferred Agent |
└────────────────────────┘
| |
| ┌─────────┐
| ▼ ▼
┌───────────┐ ┌─────────────┐
| Available | | Unavailable |
└───────────┘ └─────────────┘
| | |
| ▼ ▼
┌────────────┐ ┌────────────────┐
| Route to | | Wait up to 30s |
| Preferred | └────────────────┘
└────────────┘ |
| ▼
| ┌───────────────────┐
| | Still Unavailable |
| └───────────────────┘
| |
| ▼
| ┌────────────────────────────┐
| | Standard Skill-Based Route |
| └────────────────────────────┘
While checking for a preferred agent, the system ignores skills. If the preferred agent times out, the system expands to all agents and applies skill matching.
Skill Relaxation
When no agents match all required skills, the system progressively relaxes requirements over time:| Time | Relaxation |
|---|---|
| 0–60s | Full requirements enforced |
| 60–120s | Optional skills dropped |
| 120–180s | Proficiency requirement dropped |
| 180s+ | Secondary skills dropped |
Configuration Reference
Load Balanced Routing (V3)
Distributes conversations evenly without proficiency weighting.How It Works
- Routes to the agent with the oldest last-assignment time.
- Checks skill eligibility only — proficiency ranking is not applied.
- Prevents recently assigned agents from being prioritized again.
Use Cases
- High-volume queues requiring even workload distribution
- Teams with similar skill levels
- Reducing the risk of agent burnout
Configuration Reference
Conditional Group Routing
Conditional Group Routing (CGR) reduces customer wait times by expanding the agent pool beyond a single queue — without affecting other queues’ service levels. Configure CGR at the queue level for queues with a single channel type. Enable it using the toggle in the queue’s routing settings.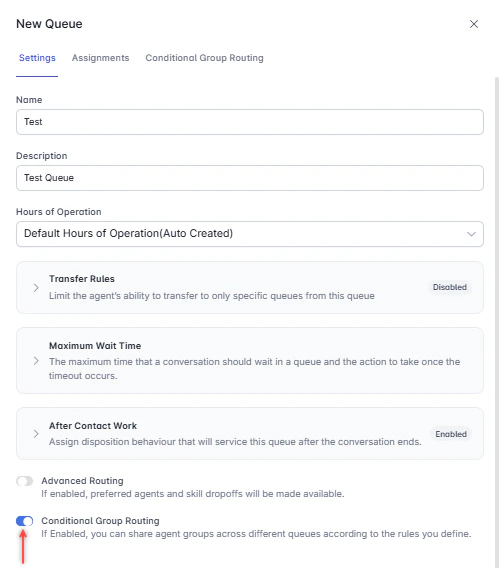
How It Works
- Initial routing: The system attempts to route within the originating queue (for example, Queue A) using standard skill and proficiency matching. This runs for a configurable period, such as 30 seconds.
-
Conditional expansion: If no eligible agent is found, the system checks other queues based on KPI conditions such as Estimated Wait Time (EWT) or Average Handle Time (AHT).
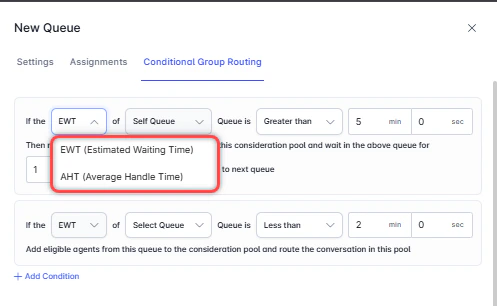
- Only queues meeting configured KPI conditions are considered.
- Agents must satisfy the skill and proficiency requirements for the conversation.
- Queues with EWT above the threshold are skipped to avoid service-level impact.
Example
| Step | Action |
|---|---|
| Conversation arrives at Queue A (EWT = 5 min) | System searches for an agent in Queue A for 30s |
| After 30s, checks Queue B | If QB EWT < 1 min → adds QB agents to the pool |
| If QB EWT ≥ 1 min | Evaluates Queue C |
| Agent found | Routes to the most suitable agent in the expanded pool |
Benefits
- Reduces wait times in high-load queues
- Maintains service levels using KPI-based conditions
- Preserves service quality by considering skill and proficiency
Priority-Based Routing
Assigns priority levels (1–10) to conversations. Higher-priority conversations are matched to agents first.Priority Factors
| Factor | Example |
|---|---|
| Intent | Account closure requests routed to expert agents at priority 1 |
| Ticket value | VIP customers with transactions > $10,000 given higher priority |
| Location | Specific regions prioritized for faster or localized response |
| Wait time | Conversations waiting longer than 5 minutes automatically escalated |
Multi-Queue Agent Assignment
When agents belong to multiple queues:- Higher-priority conversations are matched first.
- For equal priority, preference goes to conversations with a preferred agent match.
- If no preferred agent exists, skill match determines assignment.
Dynamic Priority Adjustment
Priorities can change while a conversation waits in queue:Configuration Reference
Language-Based Routing
Routes conversations to agents who speak the customer’s language. Both conversations and agents are assigned language attributes. Only agents proficient in the detected language are eligible for assignment.Configuration Reference
Winning Agent Selection
The routing engine selects the best agent based on:- Routing method — preferred agent, skill-based, or skill relaxation over time
- Agent availability
- Skill and language match
- If enabled: skill proficiency and current load (for digital interactions)
If a preferred agent is configured, the conversation waits until the preferred agent’s timeout expires before routing to other agents.
Percentage-Based Routing
Use a Script node in the flow to split conversations across destinations by percentage.Example: 60/40 Split
- Add a Script node that generates a random integer between 0 and 9.
- Map values 0–5 (60%) to Destination A.
- Map values 6–9 (40%) to Destination B.
- Add a Split node (If-Else) to evaluate the generated number.
- Route to the appropriate destination based on the result.
Routing Fallbacks
Handle scenarios when no agents are available.Configuration Reference
Routing Rules
Create complex routing logic using conditions and actions.Example Rules
Queues
Queues are virtual waiting areas that hold conversations until the system assigns an agent. A conversation can only be in one queue at a time. To access Queues, go to Contact Center AI > ROUTING > Queues.
| Column | Description |
|---|---|
| Queue | Name and description of the queue |
| Actions | Edit Queue option |
| Agents | Agents available for the queue |
| Mode | Simple or Advanced routing mode |
| ACW | After Call Work configuration |
| Status | Active or Inactive |
Add a Queue
- Select New Queue at the top-right of the Configuration page.
- Configure the queue using the tabs below.
Settings
Available in both Simple and Advanced routing modes.| Setting | Description |
|---|---|
| Name | Identifies the queue |
| Description | Optional short description |
| Hours of Operation | Select from configured hours |
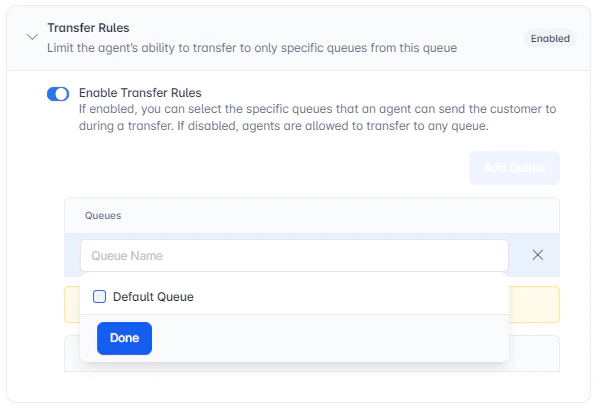
| Transfer Rules | Restrict agents to transfer only to specified queues; if disabled, agents can transfer to any queue |
| Maximum Wait Time | Maximum time a conversation waits before the No Available Agent flow is triggered |
| After Call Work (ACW) | See ACW options below |
| Advanced Routing | Enable to configure preferred agents and skill drop-offs |
If the customer ends the chat before transfer completes, the transfer is dropped and the interaction is not assigned to any queue or agent. This applies to chat conversations using WebSDK v1.0.
| Option | Behavior |
|---|---|
| Immediate Slot Release | Slot opens as soon as the conversation ends; agents finalize disposition at their convenience |
| Timed Slot Release | Slot remains occupied until the agent completes disposition or the timer (10 seconds–15 minutes) expires |
| Indefinite Slot Release | Slot remains occupied until the agent submits the disposition |
Assignments
Assign agents, agent groups, or both to the queue. To assign agents:- Select Add Agent.
- Select the checkbox next to an agent’s name and select Done.
- Select Add Agent Group.
- Select the checkbox next to a group name and select Done.
Note: Agents added through an agent group are not displayed in the agents list. Both individual agents and agent groups are listed separately.
Preferred Agents (Advanced Routing only)
- In the Preferred tab, find the agent and select the Preferred checkbox.
- Under Advanced Settings, configure the preferred agent timeout.
During a preferred agent check, skills are ignored. If the preferred agent times out, the system expands to all agents and applies skill matching.
Skills (Advanced Routing only)
- In the Skills tab, search for a skill to assign to the queue.
- Choose whether the skill should expire and set the expiry time. When a skill expires, the conversation routes based on remaining assigned skills.
Additional Configuration
Outbound Phone Numbers:- Enter phone numbers or select from the list.
- Select Apply.
- Enter email IDs or select from the list.
- Select Apply.
Edit a Queue
- Select the Edit icon next to the queue.
- Make your changes and select Save.
Delete a Queue
- Select the Edit icon next to the queue.
- Select Delete on the left side and confirm.
Deleting a queue removes all corresponding routing rules. A queue cannot be deleted if an active campaign is associated with it — deactivate all campaigns first.
Assign a Conversation to a Queue
You can assign a conversation to a queue in two ways:- Using the Set Queue node in an experience flow.
- Using the
agentUtils.setQueue()method in a script.
Route to Queue Override for Out-of-Hours
Enable the Route to Queue toggle to transfer conversations to a target queue when a queue enters out-of-hours. Selecting a target queue is required. The transfer preserves routing logic, metrics, and conversation history. To prevent queue bouncing across time zones, the system tracks an Out-of-Hours Count per conversation. Administrators set a Max Out-of-Hours Transfer Limit (default: 10) at the environment level. If the count exceeds this limit, the system closes the conversation gracefully.When Contact Center Permission Is Disabled
Administrators can restrict selected users from participating in contact center interactions. Disabled users:- Cannot access contact center functionality or appear in agent status lists.
- Can still access Automation AI, Agent AI, or Search AI based on their assigned roles.
- Appear with a Disabled tag in user management and agent selection lists.
- Do not appear in active analytics dashboards.
Agent permissions cannot be disabled if the agent is the only member of the queue or is engaged in an active conversation.
Skills
Skills represent agent attributes — such as product expertise, process knowledge, or language proficiency — used to route conversations to the most qualified agent. Language is a default skill that every agent must have. Examples:- Languages: English, Hindi, Spanish
- Customer interactions: Retention, upselling, cross-selling

Proficiency Levels
Every skill has four proficiency levels that determine agent ranking during routing:| Level | Name | Description |
|---|---|---|
| 1 | Novice | Basic knowledge, needs guidance |
| 2 | Average | Handles common scenarios |
| 3 | Good | Handles complex issues |
| 4 | Expert | Deep expertise, can train others |
Add a Skill
Before adding a skill, create a skill group (see Skill Groups). Contact Center AI includes a Default Skill Group out of the box.- Select the skill group to expand it.
- Select + New Skill.
- In the Add New Skill window, enter:
- Skill Name
- Description
- Agent Assignments: Select agents and assign a proficiency level — Novice, Average, Good, or Expert.
- Select Create.
Add a Skill Using a Script
You can add skills dynamically using Script nodes in dialog flows or Contact Center AI flows. Available methods:| Method | Description |
|---|---|
setSkills(skillsInfo) | Appends skills to the current conversation. skillsInfo is an array. |
getSkills() | Returns an array of skills in the current conversation. |
getSkillById(skillId) | Returns a skill by its ID. |
deleteSkillById(skillId) | Deletes a skill from the current conversation by ID. |
deleteSkills(skillsToDelete) | Deletes one or more skills using an ID or array of IDs. |
clearSkills() | Removes all skills from the current conversation. |
setSkills()
deleteSkills()
Edit a Skill
- Select the skill group to see its skills.
- Select the Edit icon next to the skill.
- Make your changes in the Edit Skill window.
- Select Save.
Delete a Skill
Deleted skills cannot be restored.
- Select the skill group to see its skills.
- Select the Edit icon next to the skill.
- Remove all agent assignments:
- Scroll to Agent Assignments.
- Select the Delete icon for each agent and confirm each deletion.
- Select Save.
- Select the Delete Skill icon and confirm.
Skill Groups
A Skill Group organizes similar skills. For example, Sales is a skill group containing skills like upselling, cross-selling, and presales.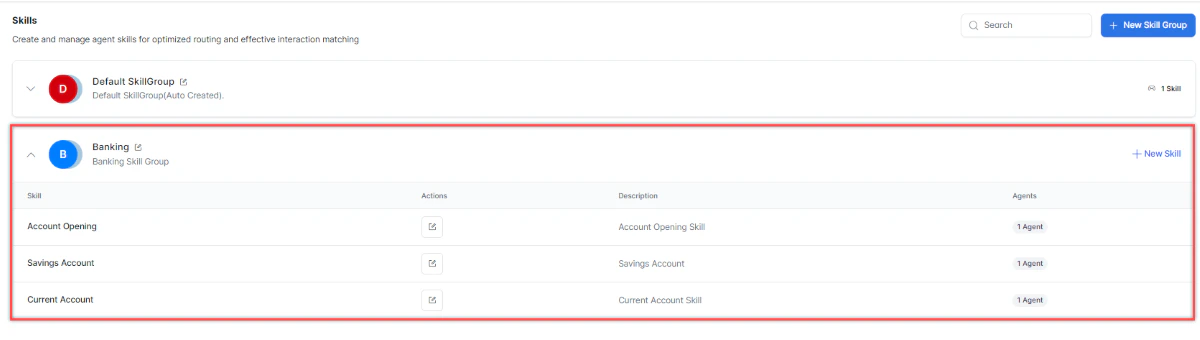
Skill groups and skills can share names across groups. Within the same group, skill names must be unique.
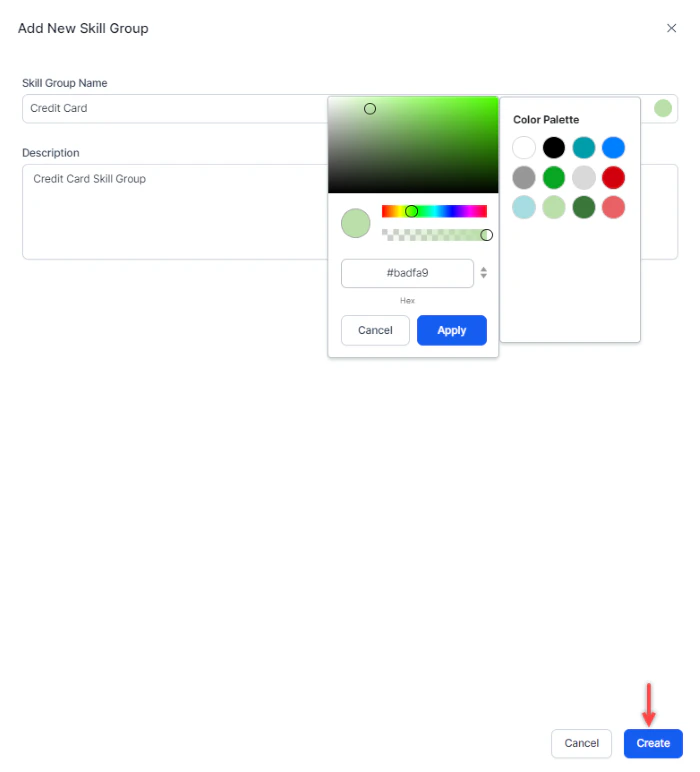
Add a Skill Group
- Select + New Skill Group.
-
In the Add New Skill Group window, enter:
- Skill Group Name
- Description
- Color: Use the color picker, hex value, or preset palette.
-
Select Create.
Edit a Skill Group
- Select the Edit icon next to the group.
- Make your changes and select Save.
Delete a Skill Group
Deleted skill groups cannot be restored. You must delete all associated skills before deleting the group.
- Delete all skills in the group (see Delete a Skill).
- Select the Edit icon next to the group.
- In the Edit Skill Group window, select Delete Skill Group and confirm.
Skill Expiration
Skills can be configured to expire automatically. When a skill expires, it is removed from the agent and the agent is notified. This is useful for time-limited certifications or role-specific training. To configure expiration, set an expiry time when assigning a skill to a queue (see Skills tab in queue configuration). When a skill expires, the conversation routes based on the remaining assigned skills.Testing Routing
Use the Routing Simulator to validate your configuration before deployment.- Enter test conversation attributes.
- Select skills and language.
- Run the simulation.
- View matched agents and their ranking.
- Verify the expected routing behavior.